Monday, June 23, 2014

Mixed Media Card for the Craft Hoarders Anonymous Challenge Blog

I'm so delighted to be guest designing for the Craft Hoarders Anonymous Challenge Blog. Today is our second reveal. The challenge is to use mixed media on your projects. This was a perfect challenge for me and, I've created a textured, layered, inky, painty card.


Show us your inner mixed media diva! Use spray mists, inks, paints, modeling paste, embossing powder, pastels, chalk, and whatever messy media you can find! Let's dig into that hoard, pull out some of that "messy stuff," and use it up! There is a mess-maker hiding in all of you! Let her/him out to play!

The challenge sponsors are Stencil Girl and WorldWin Papers.

Mixed Media Card

Tips and Techniques
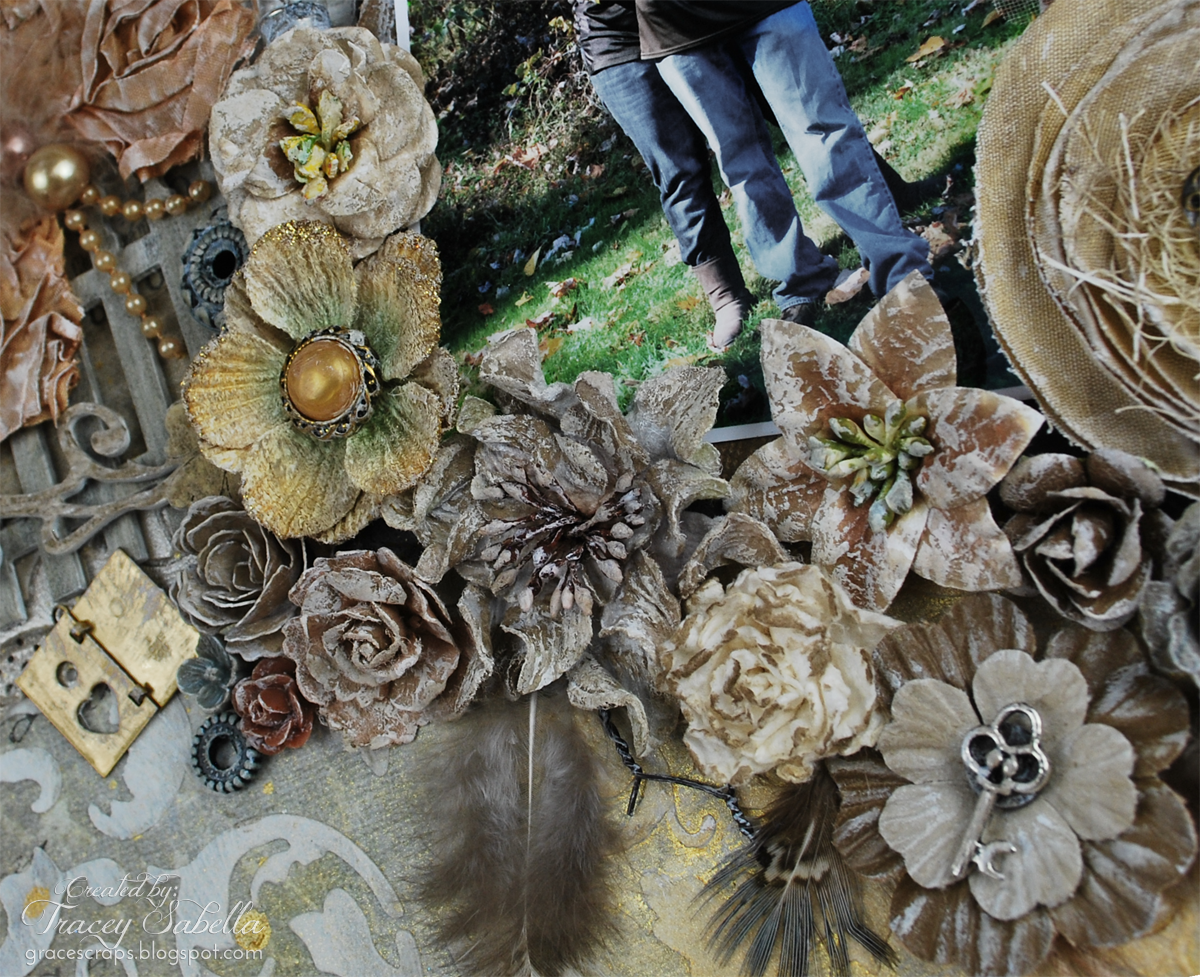
Everything on my card has been in my hoarded stash for at least a year, and some items quite longer than that. I enjoy tying triple loop bows from seam binding. This one, along with my flowers was brushed with mist and gesso.

I started with a plain white base, then added strips of a vintage book page and sheet music. I've mostly covered them, but you can see bits peeking through the layers. The gold you see here is a bit of a metallic doily layered atop the vintage papers. I've applied stenciling with Texture Effect over all. The chipboard frame is one I had painted for another project, then set it aside unused. I thought this would be a perfect opportunity to finally use it. I've dry brushed it with white gesso to distress. 

At the bottom of the card you can see where I've applied a swirl of glossy accents then clear mini marbles and gold microbeads. 

I designed and cut this oval card shape from white cardstock rescued from a photo album page insert. I wanted the front to be a perfect oval, so cut a separate piece to decorate, then adhered it to my card base. 

I hope you've enjoyed this mixed media inspiration and will create a project to
link up at the Craft Hoarders Anonymous Challenge Blog found HERE 
This challenge closes, Sunday, June 29th, midnight PT


Products Used
White Cardstock
Vintage Book Page
Vintage Sheet Music
Jute Twine
White Doily
Gold Doily
Sheetrock Mesh
Petaloo ~ Color Me Crazy - Canerbury Spray, White
Petaloo ~ Color Me Crazy - Trumpet Vine Spray, White
Petaloo ~ Color Me Crazy - Mini Pearl Daisies, White
Petaloo ~ Spring Darjeeling - Mini Daisies with Leaves
Petaloo ~ Darjeeling Petites
BBP Twisted Flowers
Pink Cherry Blossoms
Dusty Attic - Elegant Frames
Lumiere ~ Pearlescent Paint
Clearsnap by Donna Salazar ~ Mix'd Media Inx, Stormy
Liquitex~  Gesso
Martha Stewart ~ White Texture Effect
Golden ~ Soft Gel, Matte
Ranger ~ Glossy Accents
Heidi Swapp ~ Color Shine - Gold; Primrose
Tattered Angels ~ Glimmer Mist - Tuscan Sun, Cork, Tiger Lily
Beadies ~ Mini Marbles - Clear; Microbeads - Gold
Clearsnap ~ Embossing Powder - Clear
Pink Paislee ~ Christy Tomlinson Mask - Vintage Lace
Helmar ~ 450 Quick Dry Adhesive
Helmar ~ Premium Craft Glue
Martha Stewart ~ Mini Scoring Board
Darice ~ Heat Tool
Silhouette ~ Cameo

Thanks for stopping by today! I treasure your comments.

~ Blessings ~

Sunday, June 22, 2014

Mixed Media Love Card for Donna Salazar

I have a Donna Salazar project to share with you today. I've created a mixed media card for the wedding shower of a sweet young couple. The bride-to-be is so lovely and plans to frame it as a decor piece for the new home they will be sharing. I've featured lots of Donna's amazing products, but particularly her Spellbinders dies for the butterfly and handcrafted flowers.

"Love Cherish"

Tips and Techniques
I create one of my Crushed Voile Peonies, but before assembling the layers dyed them by spritzing Caramel Latte Smooch Spritz onto my craft mat along with several sprays of water. I then pulled the petal layers through the mist to color. Once dry, I assembled as in my tutorial which can be found HERE.

These Want2Scrap chipboard flourishes were covered with pearl medium
and sprinkled with microbeads and mini marbles. 

The smaller flowers are created from Donna's Mix'd Media Stax 2 mulberry paper cut with Donna's Spellbinders Bitty Blossoms Dies. They were brushed with Smooch Spritz, then when dry with Clearsnap Glue Gloss and sprinkled with Twinkle Dust Glitter (formerly Fairy Dust Glitter).

The butterfly is fussy cut, and I used Mix'd Media Inx to stamp this
sweet sentiment and crackle around the edges. 

I layered the paper strip, lace and doily using soft gel medium, then brushed
Donna's Caramel Latte Smooch Spritz across the Dictionary paper.

I applied more Glue Gloss across the bottom corner and sprinkled with Twinkle Dust Glitter.

A tutorial for the Twinkling Butterfly can be found HERE.


Donna Salazar Products
GCD Studios ~ Fun and Funky 12 x 12" Paper Pad
GCD Studios ~ Mix'd Media Stax 2 - Mulberry Paper and Dictionary Page
GCD Studios ~ Spring in Bloom 12 x 12" Paper Pad
Clearsnap ~ Mix'd Media Inx - Chiffon
Clearsnap ~ Mix'd Media Inx CHOX - Sparrow, Driftwood
Clearsnap ~ Smooch Spritz, Caramel Latte
Clearsnap ~ Twinkle Dust Glitter, Pralines & Cream
Art Gone Wild ~ Crackle
Spellbinders ~ Grand Peony
Spellbinders ~ Bitty Blossoms
Spellbinders ~ Wonderful Wings
Zutter ~ Distrezz-it-All

Other Products
Cardstock ~ Cream
Darkroom Door ~ Wordstrips - Venetian
Doily
Want2Scrap ~ Teardrop Pearls, White
Want2Scrap ~ Baby Bling Pearls, White
Want2Scrap ~ Chipboard Style C - Kathie
Want2Scrap ~ Chipboard Style D - Martha
Liquitex ~ Gesso
Golden ~ Soft Gel, Matte
Beadies ~ Mini Marbles, Clear; Microbeads, Silver
Viva ~ Pearl Pen, Cream
Pan Pastels
Close To My Heart ~ He Is Risen
Spellbinders ~ Radient Rectangles
Clearsnap ~ Glue Gloss
Helmar ~ 450 Quick Dry Adhesive; Premium Craft Glue
Spellbinders ~ Artisan X-plorer

Thanks for stopping by! I treasure your comments.

~ Blessings ~

Friday, June 20, 2014

Father's Day Cards for Helmar

Hi everyone! I hope you've had a wonderful week and had an opportunity last weekend to celebrate with the special fathers in your life. Today I'm sharing two Father's Day cards created for special men in my life featuring Helmar adhesives.

Over the course of my paper crafting journey, I've attempted a variety of methods for adhering my paper layers together. Even though my style leans toward grungy mixed media, I like things to be lined up nicely. Helmar Premium Craft glue works perfectly to adhere my paper layers together by allowing time to adjust and position without warping the paper.

This first card is one I crafted for my father.

"Happy Father's Day"
My father is an Air Force veteran and was thrilled with this vintage patriotic themed card.

Tips and Techniques
I cut my patterned paper to size then applied Helmar Premium Craft Glue around the edges, swirling some across the center. When I flip the paper over to adhere to the card base, I use my fingers or a brayer to press out the glue out into a thin layer. Notice that I did not apply the glue too close to the edge, so when it spreads out, it won't ooze out. 

Here's the finished inside.
You can see how nicely the layers line up with the card base.

I applied a clear crackle medium to these vintage flag chipboard pieces. Although these flags were chipboard stickers, I find that the tackiness on the back does not adhere as permanently as I would like, so I peeled the sticky portion off and adhered with Helmar 450 Quick Dry Adhesive instead.

The background was aged by applying molding paste using a ledger stencil. I then applied pan pastels to color and age. To seal the Pan Pastels, I spritzed with Helmar Crystal Kote Fixative Spray.

~ ~ ~ ~ ~ ~ ~ ~ ~

This is the card I created for my wonderful husband. 

"Cherish"

Tips and Techniques
I've added lots of metal gears adhered with Helmar 450 Quick Dry Adhesive

Although the background was already printed, I've added additional stamping and heat embossed the sentiment. 

Another view.

You can see that I've used several layers for the inside of this card, adhering the paper and chipboard as described for the previous card. 

Thanks for stopping by today.
I hope you'll try out Helmar Premium Craft Glue in your layered paper projects!

Helmar Products

Other Products

Happy Father's Day
BoBunny ~ Weekend Market Card Kit
BoBunny ~ Decaf Dot
Pan Pastels ~ Red Oxide, Extra Dark
Ranger ~ Distress Ink - Vintage Photo
Liquitex ~ Flexible Modeling Paste
Ranger Crackle Accents
The Crafter's Workshop ~ 12 x 12" Template - Ledger

Cherish
BoBunny ~ Et Cetera - Cut Outs
BoBunny ~ Timepiece Home
Kraft Cardstock
BoBunny ~ Timepiece - Dimensional Stickers
Michaels Metal Embellishments ~ Cherish (256434)
Explorer Traditions ~ Gears
Bead Landings ~ Ruler
Bead Landings ~ Bezels, Frames & Filigree
Tattered Angels ~ Glimmer Mist - Cork
Liquitex ~ Gesso, white
Clearsnap by Donna Salazar ~ Mix'd Media Inx - Truffle, Stormy, Adobe
Clearsnap by Donna Salazar ~ Mix'd Media Inx CHOX, Sparrow
Clearsnap ~ Embossing Powder, Clear
BoBunny ~ Clear Stamps - Et Cetera
Deep Red ~ Steampunk Gears
Stampers Anonymous ~ Flights of Fancy
Inky Antics ~ Magnificent Men
Zutter by Donna Salazar ~ Distrezz-it-All
Darice ~ Heat Tool

Thanks for stopping by! I treasure your comments.

~ Blessings ~

Tuesday, June 17, 2014

Always & Forever Wedding Card for Leaky Shed Studio

I've stepped away from mixed media today to share a wedding card created for Leaky Shed Studio. I wanted the card to have an elegant feel. The damask and heart shapes fit perfectly with this design. What is a wedding without bling? I've glittered my Leaky Shed Studio chipboard pieces to add an elegant sparkly touch to this card. 

Always & Forever

Tips and Techniques
Leaky Shed Studio has a large variety of styles in their chipboard. I wanted this card to have an elegant feel, so I selected this Large Damask piece to layer behind my flower. I'm always cutting my chipboard into pieces and this is no exception. I cut the damask into two pieces with the flower hiding the cut edges.

A tutorial for my Crushed Voile Peony can be found HERE.

Here's a close-up where you can see how glittered this is. It is such an easy technique. I painted the Large Damask piece with black gesso, but any coordinating paint will work. Once dry, I spread glue across the piece and sprinkled with fine black glitter. My favorite glue for glitter applications is Art Institute Designer Dries Clear, which really holds the glitter in place.

I also glittered one of the Medium #2 Hearts as an accent. I pulled out the older Enchanted collection from BoBunny to work with. Yes, the wedding colors include purple, which I've accented with. I've done lots of layering, stitching and even some fussy cutting here and inked some of the edges to highlight.

One final view.

Leaky Shed Studio Products

Other Products
BoBunny ~ Enchanted: Stripe, Romance, Fairytales
BoBunny ~ Grape Dot
Cardstock - White, Black
BoBunny ~ Enchanted Combo Stickers
BoBunny ~ Enchanted Brads
BoBunny ~ Plum Purple Lace
White Thread
Crushed Voile - White
Ranger ~ Distress Ink - Black Soot; Seedless Preserves
Hampton Art ~ A la Mode - Glitter, black
Liquitex ~ Gesso, Black
Spellbinders by Donna Salazar ~ Grand Peony
Helmar ~ Fabric Glue
Helmar ~ 450 Quick Dry Adhesive
Helmar ~ Premium Craft Glue
Helmar ~ Zapdots - 1/2 inch square, clear
Art Institute ~ Designer Dries Clear Adhesive
Spellbinders ~ Artisan X-plorer
EK Success ~ Honey Bee Scissors
Martha Stewart ~ Mini Scoring Board
Sewing Machine

Thanks for stopping by! I treasure your comments.

~ Blessings ~

Friday, June 13, 2014

Published at Scrapbooking.com

I'm so excited to share that two of my layouts have been published in the

Click on the links to view the articles:


Be sure to check out the entire June Issue of Scrapbooking.com Magazine.
You are sure to be inspired and best of all it's free!

~ Blessings ~

Tuesday, June 10, 2014

Together Layout for Donna Salazar

I'm up today on the Donna Salazar Blog with this mixed media layout.

I never tire of creating wedding photo layouts. Elizabeth and Andrew's wedding photographer knew they had saved their first kiss for their wedding day, so there are lots of wonderful photos of them sharing these precious moments.

I've pulled out Donna's Botanique paper collection for this page. The colors and design from this line are just perfect for this photo. I enjoy creating handcrafted flowers with Donna's amazing Spellbinders dies, and her Smooch Spritz is a great color medium.

"Together"

Tips and Techniques
I enjoy playing with texture and color. The rich golden yellows and  pale purples are spritzed and brushed on with Donna's Clearsnap Caramel Latte and Mixed Berries Smooch Spritz. I've also brushed on and splattered white gesso. Before adding any other mediums, I applied clear gesso across the page so it would stand up the the moisture in the media I planned to apply.

I've centered my Crushed Voile Peonies with Mulberry Paper Bitty Blossoms. I brushed them with Pan Pastels, then dry brushed with white gesso. The lace pieces are cut from a length of vintage lace and colored with Smooch Spritz. I have quite a hoard of jewelry pieces and this piece works so well with this page design. 

My Crushed Voile Peony tutorial can be found here

Stay tuned for my Mulberry Paper Bitty Blossom tutorial coming later this month.

This close-up not only shows my flower, but the layers of texture and colors. I've applied molding paste with Donna's Want2Scrap stencil, lace, brushed and splattered white gesso, and Smooch Spritz. The little hearts and dots above the textured strip are waste from border strips I punched. I applied them with Soft Gel Matte Medium, then dry brushed with white gesso.

To achieve these textured hearts, I applied light molding paste with Donna's Want2Scrap Heart Stencil and while wet, sprinkled with Mix'd Media Inx Embossing Powder in Chiffon. I used my heat tool to melt the embossing powder, which creates amazing bubbled texture that catches and holds color. I brushed Mixed Berries Smooch Spritz onto each heart, then Caramel Latte over the entire strip. 

This heart is formed using Donna's Love Stencil by Want2Scrap, I brushed Smooch Spritz around the edges to highlight.

I've cut out the paper lace pieces in my clusters from another sheet. Not shown here, the butterflies floating across the page are also fussy cut. These paper pieces are adhered to the background, dry brushed with gesso, then brushed with Caramel Latte Smooch Spritz to color and blend with the background.

I had these little trinkets in my stash. I dry brushed them with gesso, then rubbed with Mix'd Media Inx. The cheese cloth was dyed with Smootch Spritz.

This chipboard piece from Want2Scrap was painted with white gesso, then brushed with Smooch Spritz in Caramel Latte and Mixed Berries. I added a little heart charm to the O in the title piece.

The textured background is misted with Donna's Caramel Latte Smooch Spritz, dry brushed with white gesso, then splattered with more gesso.


Donna Salazar Products
GCD Studios ~ Botanique 12 inch Paper Pad
GCD Studios ~ Mix'd Media Stax 2 - Mulberry Paper
Clearsnap ~ Mix'd Media Inx - Berries, Wisteria
Clearsnap ~ Mix'd Media Inx Embossing Powder ~ Chiffon
Clearsnap ~ Smooch Spritz - Caramel Latte
Clearsnap ~ Smooch Spritz - Mixed Berries
Want2Scrap ~ Heart Stencil (Small)
Want2Scrap ~ Love Stencil w/Polka Dot Heart and Arrow
Spellbinders ~ Grand Peony
Spellbinders ~ Bitty Blossoms
Zutter ~ Distrezz-it-All

Other Products
Want2Scrap ~ Chipboard Embellishments - Vintage Fancy Frames
Want2Scrap ~ Chipboard Embellishments - Together
Studio G ~ Metal Charms - VAC 0004
Momenta ~ Metal Stickers - ST-5735
The Charm Shop ~ Metal Silver Heart
 Filigree Medallion ~ Stash
Vintage Lace ~ Stash
Crushed Voile Fabric (Stash)
Tim Holtz ~ Tissue Tape
Liquitex ~ Clear Gesso, White Gesso
Golden ~ Light Molding Paste
Pan Pastels
Fiskars ~ Hearts Border Punch
Stampers Anonymous ~ Layering Stencil - Doily
Helmar 450 Quick Dry Adhesive
Darice ~ Heat Tool
Ranger ~ Heat It

Thanks for stopping by! I treasure your comments.

~ Blessings ~

Monday, June 9, 2014

Hope Card ~ Guest Designing for Craft Hoarders Annonymous

I'm so delighted to share that the amazingly talented Gloria Stengel has invited me to guest design for her Craft Hoarders Anonymous Challenge Blog this month. This first project is all about folding, and I've created a pleated butterfly (lots of folds here) to adorn my card. Her challenges encourage us to use our hoarded supplies, so I've used items that have been in my stash for at least a year and many of them much longer than that. 

Use some sort of "fun fold" on your project. You can make a fun fold card, a pop-up card, an explosion box, or other type of project that makes use of folded cardstock or paper. You can share some folding techniques that are perfect for scrapbook layouts or mixed media pieces. Create a mini album with a folded binding. Fold some ribbon to make pleats. De-hoard those supplies and show us your folds....paper folds that is!

Sponsors: WorldWin Papers and StencilGirl

"Hope"


Tips and Techniques
I created this lovely butterfly using a pattern and tutorial posted by Leeann Greff at Flowerbug's Inkspot. You can find her tutorial here.

Once I folded and created the butterfly, I brushed it with several colors of Ranger's Perfect Pearls powders mixed in water to distress and color. The body is a jewelry finding piece from my stash.

The glittered Hope transparency sticker came in a kit I bought years ago. I just never had the right project for it, until now!! 

 I clustered these older Petaloo flowers along the side with berries and dried grape vine sprigs. 

Here's a final, angled shot. 

I squeezed glossy accents in the corner below the sticker and sprinkled with silver microbeads which were popular in paper crafting a few years back. I've been seeing them used in mixed media this year and have raided my hoarded stash to bring sparkle and dimension to my projects in recent days.

Products
We R Memory Keepers ~ Anthologie - Medley, Potpourri
Ivory Cardstock
Fancy Pants Designs ~ Glitter Cuts Diecuts - Hope
Petaloo ~ Velvet Hydrangea - Blue
Petaloo ~ Chantilly Mixed Blooms - Cream
Berry Sprig ~ Stash
Grape Vine ~ Stash
Jewelry Finding ~ Stash
Creative Charms ~ Vintage Brads VP-8206
Kaisercraft ~ Pearls - Lemon
Queen & Co ~ Pearls - Sunflower Yellow
Ranger ~ Perfect Pearls - Heirloom Gold; Blue Patina; Perfect Bronze
Beadies ~ Microbeads - Silver
Helmar ~ 450 Quick Dry Adhesive
Helmar ~ Premium Craft Glue
Helmar ~ Liquid Scrapdots
Idea-ology ~ Paper Distresser
Martha Stewart ~ Mini Scoring Board
Ranger ~ Heat It Craft Tool

I hope you've been inspired to dig into your scrappy hoard to create a project for the Craft Hoarders Annonymous Paper Folding Challenge. Stop by the blog here for details and to link your project.

Thanks for stopping by! I treasure your comments.

~ Blessings ~

Tuesday, June 3, 2014

Love Always ~ for Leaky Shed Studio and OUAS

The June Challenge has been revealed at Once Upon A...Sketch and this is my take on Nadia's gorgeous sketch and theme featuring fabulous Leaky Shed Studio chipboard.

I'm so blessed to have such a great relationship with our son and his wife, Rachel. This is one of their engagement photos. She was a Steeler's fan while Joseph is a Brown's fan. If you're not familiar with the NFL, that's one big rival, but they have not let it cause a house divided.

"Love Always"
(Journaling behind photo - details below.)


Journaling Theme: The following quote

 "The Best Things in Life Aren't Things" 

You are free to interpret our theme ANY WAY you like. It is for your inspiration and this theme word DOES NOT need to be part of your title or journaling. But please make sure your layout is based on the sketch below and includes journaling (hidden journaling is fine). Acceptable journaling is MORE than just a sentence, or generic writing such as date/place etc. It needs to be present and at least 3 lines long. Remember, hidden journaling (under a photo/tag or behind your page) is perfectly fine but please DO let us know in your post where your journaling is! 


Tips and Techniques
I painted the Leaky Shed Studio Heart Key with Gold Color Shine Mist, then dry brushed with Gesso. The background is stenciled with molding paste, then misted and splattered. The flowers and metal elements are dry brused with Gesso, then brushed with cork glimmer mist. 

I wanted the Leaky Shed Studio Picket Fence to look weathered, so I painted it with gesso, with the brush strokes going in the direction of wood grain, then I brushed it with a couple colors of mist that settled into the brush strokes to look like wood. The Prima butterfly wings are also dry brushed with Gesso and mist. 

I cut the Leaky Shed Studio Harja Flower into pieces and used half on each side of the page. I simply textured with gesso and brushed mist for this gorgeous effect. I've stamped the butterfly images in the corner.

I've used a mix of handcrafted flowers, pre-made flowers, and trinkets to cluster around my photo. I've also tucked in chicken wire and feathers. 

My Bitty Blossom tutorial can be found here.

Journaling is a required element in our Once Upon A...Sketch projects, and I've included my journaling on a tag tucked behind my photo mats. The handcrafted flower camouflages the tag once it's tucked into place.

A tutorial for my Embossed Vellum Flower can be found here.

For all the June Challenge details and to link your project, stop by the


Leaky Shed Studio Products

Other Products
7 Dots Studio ~ Cold Country - Secret Diary
GCD Studios by Donna Salazar ~ Natural Beauty Collection
GCD Studios by Donna Salazar ~ Mix'd Media Stax 2
DCWV ~ Big Floral Embossed Paper
Cardstock
Petaloo ~ Beaded Peonies - Small
Petaloo ~ Canterbury Rose, Charcoal
Petaloo ~ Expressions Fabric Flowers, Camel
Prima ~ Arco Iris Flowers
Prima ~ Lady Bird Collection
Prima ~ Ameruse Duchess Mix
Prima ~ Parisia Mayfair Mix
Prima ~ Sugar Plum Roses, Cinnamon
Prima ~ Cotton Tape
Prima ~ Butterfly Kiss Moulin
Recollections 255380
Tim Holtz ~ Tissue Tape
Spare Parts Mini Light Bulbs
Studio G ~ Metal Charms VAC004
Feathers (Stash)
Square Heart Locket (Vintage Trinket)
Heart Charm (Stash)
Beads (Stash)
Flower Basket Charm (Vintage Trinket)
Darice ~ Chicken Wire
Keys (Stash)
Queen & Co ~ Twinkle Goosebumps, clear
Golden ~ Light Molding Paste
Liquitex ~ Clear Gesso
Heidi Swapp ~ Color Shine - gold
Tattered Angels ~ Glimmer Mist - Cork
Spellbinders by Donna Salazar ~ Bitty Blossoms
Spellbinders by Heartfelt Creations ~ Tattered Blossoms
Martha Stewart ~ Punch Around the Page - Doily Lace
Prima ~ Stencil - Flourish 12"
Heartfelt Creations ~ Tattered Stamp
Tim Holtz ~ Flights of Fancy Stamp Set
Helmar ~ 450 Quick Dry Adhesive
Helmar ~ Zap Dots Black 1/4" Square
Zutter by Donna Salazar ~ Distrezz-it-All

Thanks for stopping by! I treasure your comments.

~ Blessings ~